In this tutorial, we will learn how to make simple Salesforce REST API calls with Postman. To get started, I would highly recommend creating a free Salesforce org for your own personal use by signing up here.
OAuth2 Authentication with Salesforce
To make any Salesforce REST API calls, you’ll need a bearer token. Think of it as a REST API access token, and without it, you’ll get a response from Salesforce telling you that the resource you’re trying to access is protected and thus, you need to authenticate.
Here, you need to pass in 5 following parameters:
- grant_type
- client_id
- client_secret
- username
- password
grant_type is always going to be a hard-coded string “password”. Your username and password parameters will be your login credentials, when you login to your Salesforce org. To retrieve client_id and client_secret, follow these steps:
- Click Setup link in the top-right page.
- On the left most panel, under Build section, expand Create and click Apps link.
- In the Connected Apps section, there should already be an app created for you called “CPQ Integration User Connected App”. If so, click app name and skip to step 7.
- If CPQ Integration User Connected App does not exist, Click New in the Connected Apps section.
- In the following page, fill out these parameters:
- Connected App Name –
REST API test(you can name this whatever you desire) - API Name – will be auto-populated
- Contact Email –
test@email.com(can be fake email) - Check Enable OAuth Settings in the API (Enable OAuth Settings) section
- Callback URL –
http://localhost - Select
Access and manage your data (api),Full access (full), andPerform requests on your behalf at any time (refresh_token, offline_access)from Selected OAuth Scopes and add them. - Should look like screenshot below:
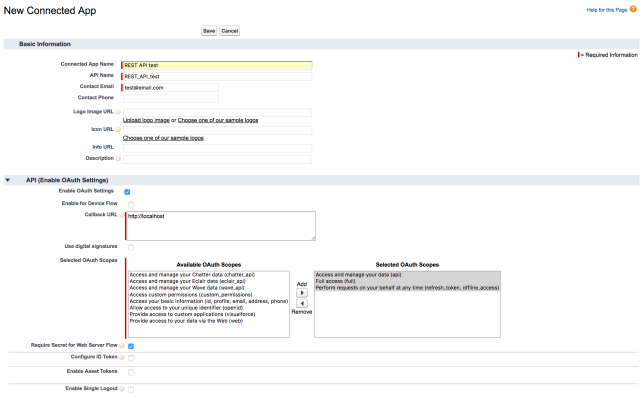
- Connected App Name –
- Click Save, and then click Continue on the following page.
- Here you’ll see the
client_idandclient_secretdenoted by Consumer Key and Consumer Secret respectively. You’ll need to refer to these values when retrieving access token from Postman.
Last thing you’ll need is the security token. You can skip this paragraph if you already have a security token in hand. When sending OAuth request, you’ll need to have security token in hand. First, go to My Settings page. In the left panel, click Personal to expand submenus. Open the Reset My Security Token submenu, then click Reset My Security Token button. It will send you an email with your security token. It’s an 24-characters long alphanumeric string.
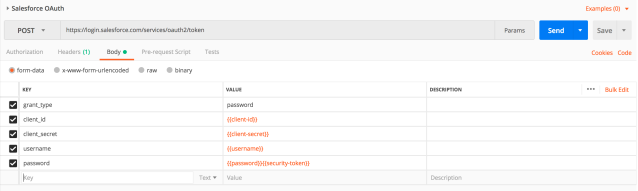
From Postman, create a new request. Set the HTTP method to POST, and the request URL should be https://login.salesforce.com/services/oauth2/token.
In the body, make sure to have form-data checked, and fill in these 5 parameters as follows:
- grant_type =
password - client_id =
<client-id-from-step-7> - client_secret =
<client-secret-from-step-7> - username =
<your-username> - password =
<your-password><security-token>
The password parameter should be your login password appended by security token you retrieved from above. For example, if your password is “mypass”, and your security token is “abcdEFGHijklmn1234567890”, your password parameter value should be “mypassabcdEFGHijklmn1234567890”.
Click Send, and you’ll get a response as follows:
{
    "access_token": "****",
    "instance_url": "https://na57.salesforce.com",
    "id": "https://login.salesforce.com/id/****/****",
    "token_type": "Bearer",
    "issued_at": "1535739081652",
    "signature": "****"
}

Only thing you need here is the access_token from the response.
Sending REST API Request
In the next request, we are going to pass in a simple SOQL query to retrieve all accounts from our Salesforce org.
Create a new request in Postman, and set the HTTP method to GET. Set the request URL to https://xx.salesforce.com/services/data/v43.0/query?q=SELECT+Id,Name+FROM+Account.
In the Authorization tab Type field, select Bearer Token. You’ll see a text field to paste in your bearer token. Copy and paste the access_token from the previous request, and click Send.
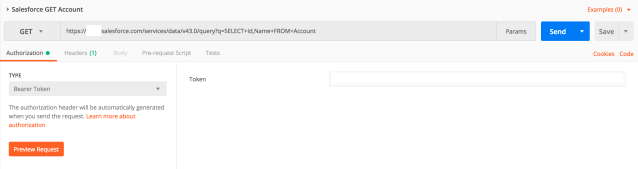
You should now get a response like below.
{
    "totalSize": 12,
    "done": true,
    "records": [
        { .... },
        { .... },
        { .... },
        ...
    ]
}